-
Q:How do I register my X3?You can sign up for a new account by clicking Login at www.xplova.com.
-
Q:How do I connect my X3 to peripheral sensors (e.g. heart rate belt)?Go to [Sensor] and you will be able to connect your X3 to multiple ANT+ peripheral devices.
-
Q:How do I remove peripheral sensors (e.g. heart rate belt) from my X3?Go to [Sensor] and you will be able to disconnect your X3 from the specific peripheral sensors you want to remove.
-
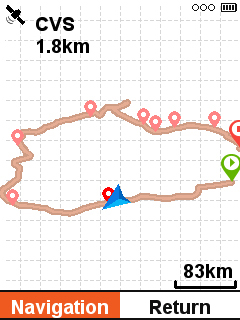
Q:My X3's GPS signal reception seems to be poor. What should I do?First, allow the unit to reacquire GPS satellite signals. If the unit is still unable to locate your current position, it might be because there are tall obstructions around you, such as elevated roads, high-rise buildings, and the like. Or you can reset the GPS receiver and locate your position again in an open area.
-
Q:How do I adjust the time set in X3's GPS module?The GPS module automatically adjusts the time once it receives GPS signals from three of the (3D) satellites. Therefore, you don't need to change it manually.
If you want to set your time zone manually, go to [Setting] > [Day Time]. -
Q:How do I change the display from kilometers to miles?Go to [Setting] > [Unit] to change from Metric system to Imperial system.
-
Q:How do I adjust the backlight timeout? What are the options? How do I turn on auto brightness?Go to [Setting] > [Display] > [Backlight Time] to choose the desired duration for backlight.
-
Q:Once I finish my ride, do I need to plug in my PC or laptop to transfer my ride activities?No, you don't need to. You can upload your activities to different platforms (e.g., Xplova, Strava and TrainingPeaks) through the Xplova Connect app.
-
Q:How do I pair my X3 with my smartphone to use the Xplova Connect app?1. Launch the Xplova Connect app on your smartphone.
2. Either tap Menu icon at the upper-left corner on My Connect screen or swipe right from the left edge of the screen to pull open the Side menu.
3. Go to [Settings] > [My Device].
4. Tap [+] icon at the bottom-right corner of the screen and select X3.
5. Follow the prompts to begin pairing. (Before pairing, please make sure you have turned on Bluetooth on your smartphone.)
6. On X3, go to [Sensor] and make sure Bluetooth is turned on.
7. On your smartphone, select X3 from the list. Please turn [Upload Activity] switch to ON (default) for automatic data transmission.
8. Once successfully paired, your actitivies will be automatically transferred from X3 to your smartphone.
*Note:
You only need to pair your smartphone with X3 once and it will automatically recognize X3 each time.
-
Q:What can I do with the Xplova Connect App?With the Xplova Connect App, you can:
1. View and store your recorded activities and performance data that are synced from your X3.
2. Upload your cycling activities to different platforms (e.g., Xplova, Strava, TrainingPeaks).
-
Q:Why can't I pair my X3 with my smartphone?Please pair your X3 with your smartphone through the Xplova Connect app.
-
Q:Why can't I pair my X3 with my smartphone through the Xplova Connect App?1. Go to [Sensor] on your X3 and check if Bluetooth is turned on.
2. In the meantime, please also make sure Bluetooth on your smartphone is turned on as well.
-
Q:What items are included in the standalone product package?The package includes the main unit, a Micro-USB cable, a bike mount kit, a quick start guide, and a warranty card.
-
Q:Is the charging cord for X3 identical to that of a cellphone?Yes, any standard Micro-USB cable for Android devices can be used interchangeably.
-
Q:Is X3's bike mount compatible with other brands' mounts?It is recommended to use Xplova X3's own bike mount kit. Using other brands' bike mounts may induce accidental vibration, and the device may fall off.
-
Q:Can I use Xplova's Heart Rate Belt or 2-in-1 Combo Sensors with other competing cycling computers?Yes, they are compatible with all ANT+ wireless-enabled sensors.
-
2019.12Notification to Xplova Connect App updatesandroid 1.0.0.107
1) Correct map route display; ex: unable to see the route in map
2) Fix Android 9.x HTTPS compatibility; ex: log-in error to Xplova
Notes: Some older version android 5.x phone may not be able to update to this app version.
-
2019.12Notification to Xplova Connect App updatesandroid 1.0.0.104 / IOS 1.24(1)
1) Update Google MAP SDK
2) Add Rotor OCA/OCP display
3) Update App ICON

-
Notification to Xplova Connect App updatesAndroid Version: 1.0.0.099
IOS Version: 1.22 (1)
1. Switch between imperial or metric units in measure
2. Enable case insensitive keyword search
3. Capbility to show 3rd party app feedback when paired
4. Bug fixes
-
2018.06Xplova Connect app Release NotesThis update is mainly to improve the performance for uploading activities to Strava.
Latest Updates & Fixes
Android (Ver. 1.0.0.54):
1. Improved compatibility with third-party platform.
2. Improved data-transferring performance for Xplova X3.
3. Improvements on UI.
4. Adjustments in accordance with EU’s General Data Protection Regulation (GDPR).
5. Bug Fixes.
iOS (Ver. 1.9.4):
1. Improved compatibility with third-party platform.
2. Improvements on UI.
3. Adjustments in accordance with EU’s General Data Protection Regulation (GDPR).
4. Bug Fixes.
-
Version 1.19 Release Notes
*Important Reminders:
1. Please back up your data in your device before upgrading to the new version. All activity .fit files are stored in the Xplova/Activity folder.
2. Please note that there are two steps that are required to upgrade to V1.19:
1) First, download and install the V1.19 (1) software.
2) Then download and install the V1.19 (2) software.*Step-by-Step Instructions:
1. Download the V1.19 (1) file.
2. Power off X3 and connect it to your computer. Then short press POWER button to enter battery-charging mode.
3. Move the V1.19 (1) file to your X3 disk (not the Xplova folder) and eject your X3.
4. X3 will automatically install the V1.19 (1) software.
5. Once finished, delete the V1.19 (1) file from your computer.
6. Download the V1.19 (2) file, and make sure the file name is x3.rsc. If not, please change it to x3.rsc manually.
7. Repeat Step 2 above.
8. Move the V1.19 (2) file to your X3 disk (not the Xplova folder) and eject your X3.
9. X3 will automatically install the V1.19 (2) software and upgrade to V1.19.
*Note that the file name of both V1.19 (1) file and V1.19 (2) file are identical as x3.rsc. However, please do not change them and always make sure they remain as x3.rsc when you move them to your X3 disk.
New Features:
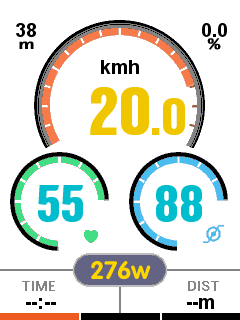
1. Graphical Dashboard
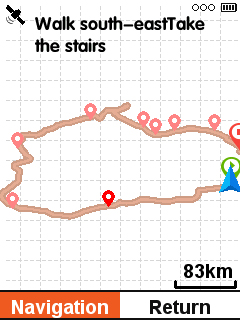
2. Turn by Turn & SmartSign Guidance
3. Bug fixes and sensor compatibility improvements.